Gnuplotting

Create scientific plots using gnuplot

September 23rd, 2016 | 4 Comments

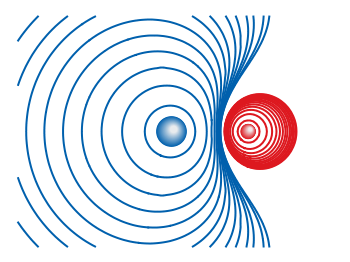
Suppose you have a large circular container filled with sand and measure its density at different positions. Now the goal is to display your measurements as a heat map extrapolated from your measurements, but limiting that heat map to the inner part of the container as shown in Fig. 1.

circular heat map

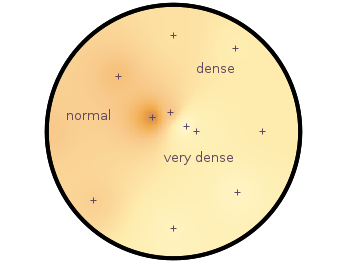
Fig. 1 Sand density measured at different positions in a circular container (code to produce this figure, sand.pal, data)

The underlying measurements are provided in the following format:

# sand_density_orig.txt
#1      2        3        4      5       6
#prob   x        y        z      density description
"E01"   0.00000 -1.14161 -0.020  0.7500  "dense"
"E02"  -0.94493 -0.81804 -0.020  0.5753  "normal"
"E03"   0.75306 -0.72000 -0.020  0.7792  "dense"
...

Those data points have to be extrapolated onto a grid for the heat map, which can be achieved by the following commands.

set view map
set pm3d at b map
set dgrid3d 200,200,2
splot "sand_density1.txt" u 2:3:5

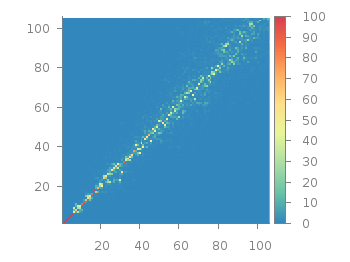
Fig. 2 shows the result which has two problems. The grid data is limited to the boundary given by the measurement points. In addition, the grid is always rectangular in size and not circular.

circular heat map

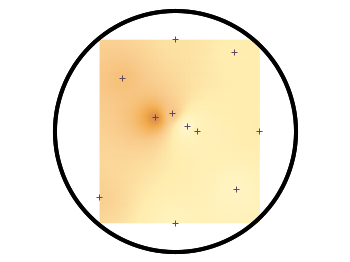
Fig. 2 Sand density measured at different positions in a circular container (code to produce this figure, sand.pal, data)

To overcome the first problem you have to add four additional points to the original data in order to stretch the grid boundary to the radius of the container. For that you have to come up with some reasonable extrapolation from the existing points. I did this in a very simple way by a mixture of linear interpolation or using the value of the nearest point. If you want to do the same with your data set you should maybe spent a little bit more effort on this.

# sand_density.txt
#1      2        3        4      5       6
#prob   x        y        z      density description
"E01"   0.00000 -1.14161 -0.020  0.7500  "dense"
...
"xmin" -1.50000  0.00000 -0.050  0.5508  "dummy"
"xmax"  1.50000  0.00000 -0.050  0.6634  "dummy"
"ymin"  0.00000 -1.50000 -0.050  0.7500  "dummy"
"ymax"  0.00000  1.50000 -0.050  0.6315  "dummy"

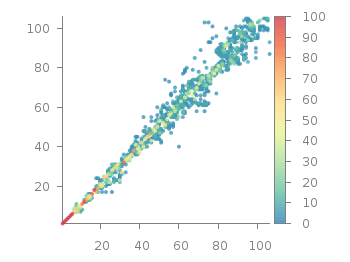
If you plot those modified data set you will get Fig. 3.

circular heat map

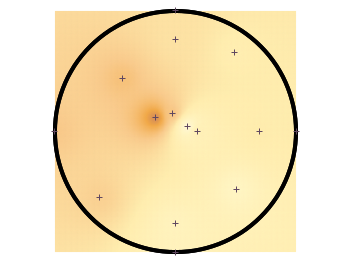
Fig. 3 Sand density measured at different positions in a circular container (code to produce this figure, sand.pal, data)

In order to limit the heat map to a circle you first extrapolate the grid using dgrid3d and store the data in a new file.

set table "tmp.txt"
set dgrid3d 200,200,2
splot "sand_density2.txt" u 2:3:5
unset table

Afterwards a function is defined in order to limit the points to the inner of the circle and plot the data from the temporary file.

circle(x,y,z) = sqrt(x**2+y**2)>r ? NaN : z
plot "tmp.txt" u 1:2:(circle($1,$2,$3)) w image

Finally a few labels and the original measurement points are added. The manually added points like xmin are removed by a smaller radius value. The result is then the nice circular heat map in Fig. 1.

r = 1.49 # make radius smaller to exclude interpolated edge points
set label 'normal' at -1,0.2 center front tc ls 1
set label 'dense' at 0.5,0.75 center front tc ls 1
set label 'very dense' at 0.3,-0.3 center front tc ls 1
plot "sand_density.txt" \
         u (circle($2,$3,$2)):(circle($2,$3,$3)) w p ls 1

February 21st, 2014 | 5 Comments

For the measurement of distances T-shaped arrows are often used to highlight the length. In gnuplot there is an easy way to achieve this.

Diffraction on a slit

Fig. 1 Diffraction of light for a slit with the length d. (code to produce this figure)

Have a look at Fig. 1 which tries to explain the diffraction phenomenon of a slit with the length d. At a distance a the diffraction pattern is drawn. The different distances, the distance between the first minima of the diffraction pattern, and the wave length are indicated by T-shaped arrows. This kind of arrays can be achieved in gnuplot with the following code.

Theads = 'heads size 0.5,90 front ls 201'
set arrow from -24,-2 to -24, 2       @Theads
set arrow from -22, 2 to -21.44,1.92  @Theads
set arrow from 1.5,-pi to 1.5,pi      @Theads
set arrow from -22,2.5*pi to 0,2.5*pi @Theads

Here, 90 is the relevant entry after size as it describes the opening angle of the arrow head.
In addition, an open circle is drawn to indicate the angle θ. This is achieved by specifying the opening angle for the circle object.

set object circle at -22,0 size 6 arc [-8:0]

June 21st, 2013 | 7 Comments

Sometimes a classical heat map will not be the best way to visualize your data in a two dimensional plane. This is especially the case, when only a few data points on the plane have different values. For example in Fig. 1 you find a projection from one vector to another to visualize its similarity. This is a method used in normal mode analysis of molecules to determine if two different
calculations yield similar results. As you can see only the data points near the diagonal vary, which is hard to see because of the small size of the points. In addition, points farer away from the diagonal having a small percentage value are more or less invisible – compare to Fig. 2.

Sparse data with image plot style

Fig. 1 Vector dot product expressed in percentage plotted with the image style (code to produce this figure, data)

In order to emphasize the data, we abounded the image plot style and use transparent circles as plotting style for visualizing the data as shown in Fig. 2.

Sparse data with circles plot style

Fig. 2 Vector dot product expressed in percentage plotted with the circles style (code to produce this figure, data)

In order to do so, we remove all values from the plot that are 0, by setting them to 1/0. Further we set the transparency of the circles to 20%. Before plotting the data we are sorting them regarding their percentage value in order to plot the highest values above the lower ones.

f(x) = x>2 ? x : 1/0
set style fill transparent solid 0.8 noborder
plot '<sort -g -k3 vector_projection.txt' u 1:2:(1):(f($3)) w circles lc palette

May 22nd, 2012 | 3 Comments

In one of the last posts we have looked at how to plot equipotential lines. Here we want to plot the equipotential lines of two sources with different charges, like an electron and a positron.

Equipotential lines of an electron and a positron

Fig. 1 Equipotential lines of an electron and a positron (code to produce this figure, electron.gnu, positron.gnu)

In addition the sources should be plotted as well, as can be seen in Fig. 1. There the electron is drawn as a red sphere with some lightning effect and the positron as a red sphere. This effect can be achieved with Gnuplot by plotting a bunch of circles with slightly different color and size on top of each other.

set for [n=0:max-1] object n+object_number circle \
    at posx(x,n,max/1.0),posy(y,n,max/1.0) size size(n,max/1.0)
set for [n=0:max-1] object n+object_number \
    fc rgb blue(n,max/1.0) fillstyle solid noborder lw 0

The size and position are determined by the posx,poxy,size functions. The color is chosen according to the blue function for the electron, which is a little tricky and composed of the three color functions r,g,b. These functions generate a color gradient starting from the blue, which is used as the line color for the equipotential lines, into a slight white.

size(x,n) = s*(1-0.8*x/n)
r(x,n) = floor(240.0*x/n)
g(x,n) = floor(144.0*x/n)+96
b(x,n) = floor(67.0*x/n)+173
blue(x,n) = sprintf("#%02X%02X%02X",r(x,n),g(x,n),b(x,n))
posx(X,x,n) = X + 0.03*x/n
posy(Y,x,n) = Y + 0.03*x/n

The code shown so far is put into external functions (electron.gnu, positron.gnu) and can be used in any script to plot equipotential lines, as the one used to generate Fig. 1.

Equipotential lines of two sources with different charge

Fig. 2 Equipotential lines of two sources with different charges (code to produce this figure)

The position and size of the source are the parameters of the functions. Fig. 2 shows the result for a negative particle with twice the absolute charge of the positive charged particle.

# positron
x1 = 2; y1 = 1; q1 = 1
# electron
x2 = 1; y2 = 1; q2 = -2
call 'positron.gnu' x1 y1 '0.1'
call 'electron.gnu' x2 y2 '0.2'

Thanks to Gnuplotter for the original idea.

May 6th, 2011 | 2 Comments

loudspeaker circle

Fig. 1 A circular loudspeaker array drawn with the object command (code to produce this figure, set_loudspeaker function)

In one of the last entries we have seen how to plot a loudspeaker with Gnuplot.
This time we will have a look at the case of setting more than one loudspeaker to your plot. Furthermore we allow the placement of the loudspeakers after entries in a data file.
Let us assume we have a data file containing the x position, y position and orientation phi of a single loudspeakers per line. Now we have to read the data with Gnuplot and set the objects according to the data. This can be done by a dummy plot, because by applying the plot command, variables can be stored. For the dummy plot we setting the output of the plot command to table and use /dev/null as the place to write the data.

# --- Read loudspeaker placement from data file
set table '/dev/null'
add_loudspeaker(x,y,phi) = sprintf(\
    'call "set_loudspeaker.gnu" "%f" "%f" "%f" "%f";',x,y,phi,0.2)
CMD = ''
plot 'loudspeaker_pos.dat' u 1:(CMD = CMD.add_loudspeaker($1,$2,$3))
eval(CMD)
unset table

The plot command now enables us to add the data from the file to the variable CMD, which is then executed by the eval command. To create the variable, the add_loudspeaker function creates a string with the data for every single line of the data file. The eval(CMD) calls the set_loudspeaker.gnu function once for every single data line, which corresponds to a single loudspeaker. The set_loudspeaker.gnu function itself does the same as we have done in the draw a single loudspeaker entry, but in addition it uses a rotation matrix to change the orientation of the single loudspeakers.

After having set the loudspeakers, we add some activity to three of the loudspeakers and finally get the result in Fig. 1.

# --- Plot loudspeaker activity
set parametric
fx(t,r,phi) = -1.5*cos(phi)+r*cos(t)
fy(t,r,phi) = -1.5*sin(phi)+r*sin(t)
set multiplot
set trange [-pi/6+pi/8:pi/6+pi/8]
plot for [n=1:3] fx(t,n*0.25,pi/8),fy(t,n*0.25,pi/8) w l ls 2
unset object
set trange [-pi/6-pi/8:pi/6-pi/8]
plot for [n=1:3] fx(t,n*0.25,-pi/8),fy(t,n*0.25,-pi/8) w l ls 2
set trange [-pi/6:pi/6]
plot for [n=1:3] fx(t,n*0.25,0),fy(t,n*0.25,0) w l ls 1
unset multiplot

The three waves before the desired loudspeakers are plotted within an iteration that effects the radius by using the for command. The unset object is executed after the first plot in the multiplot environment, because the loudspeakers should only be drawn once.

June 4th, 2010 | 6 Comments

If one have a coordinate system with n-dimension, then one of the dimensions can be expressed by the n-1 other dimensions, e.g. z = f(x,y).
But if you want to plot functions that are defined in polar coordinates, e.g. a sphere, they are complicated to define with z = f(x,y). But Gnuplot offers you a way to handle this type of functions by using its parametric mode. In parametric mode the functions are expressed in angular coordinates t or u,v dependend on the dimensions of your plot.

2D case

In the 2D case we have only one free dimension:

y = f(x)   =>   x = fx(t), y = fy(t)

In Fig. 1 we see the connections between the angular coordinate t and radius r and x,y that is given by

x = r cos(t)
y = r cos(π/2-t) = r sin(t)
Parametric 2D plot

Fig. 1 Connection between Gnuplots parametric variable t and x,y (code to produce this figure)

Using the result from above it is very easy to plot a circle:

set parametric
set trange [0:2*pi]
# Parametric functions for a circle
fx(t) = r*cos(t)
fy(t) = r*sin(t)
plot fx(t),fy(t)
Circle

Fig. 2 Plot of a circle using Gnuplots parametric mode (code to produce this figure)

3D case

In three dimensions we have the case:

z = f(x,y)   =>   x = fx(u,v), y = fy(u,v), z = fz(u,v)

In Fig. 3 we see the connection between the two angular variables u (that is t in the 2D case), v and the radius r:

x = r cos(v) cos(u)
y = r cos(v) sin(u)
z = r sin(u)
Parametric 3D plot

Fig. 3 Connection between Gnuplots parametric variables u,v and x,y,z (code to produce this figure)

Using the parametric variables u,v it is very easy to draw a sphere or a piece of a sphere:

set parametric
set urange [0:3.0/2*pi]
set vrange [-pi/2:pi/2]
# Parametric functions for the sphere
fx(v,u) = r*cos(v)*cos(u)
fy(v,u) = r*cos(v)*sin(u)
fz(v)   = r*sin(v)
splot fx(v,u),fy(v,u),fz(v)

The result is shown in Fig. 4. Note that we have to use 3.0/2, because 3/2 is 1 for Gnuplot!

Sphere

Fig. 4 Plot of a sphere using Gnuplots parametric mode (code to produce this figure)